
Sample preparation for Electron microscopy

The electron microscope is a very useful tool for viewing very small samples, such as bacteria and viruses. It can magnify objects over a million times smaller than can be seen with the human eye. It uses a stream of electrons to create an image and is more powerful than traditional light microscopes. The preparation of fresh tissue for electron microscopy is an important part of the process of understanding cell structure and function. Here are a few ways for sample preparation for Electron microscopy:
Table of Contents
1. NEGATIVE STAINING
The negative staining method is used to examine the shape and surface appearance of very small particles such as intact organelles or viruses. It is the easiest technique used for the transmission of electron microscopes.
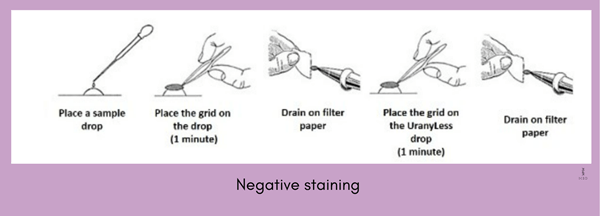
Image source- /www.emsdiasum.com

Procedure
- In the negative staining technique, specimens are suspended in a small drop of liquid, applied to a copper grid and allowed to dry in air.
- After drying, a drop of stains such as phosphotungstic acid or uranyl acetate is applied to the surface.
- When viewed in TEM, the specimen is visualized against the stained dark background.
The main advantage of negative staining is that the specimen can be observed in TEM without cutting into thin sections.
2. FREEZE FRACTURE TECHNIQUE
This is a very common approach used for sample preparation for Electron microscopy. The freeze-fracture technique is used to examine the structure of membranes and the distribution of integral membrane proteins. It involves physically breaking apart a frozen biological sample and then examining the resulting pieces.

Image source: Tsuchiya, K. (2019). Freeze-Fracture Transmission Electron Microscopy. In Measurement Techniques and Practices of Colloid and Interface Phenomena (pp. 87-92). Springer, Singapore.
Procedure
- This technique involves placing a specimen in a thin layer of liquid, freezing it and then fracturing the frozen specimen with a microtome inside an evacuated chamber at about –100 degrees C.
- The sample must be frozen slowly and carefully so that the fracture does not occur in the middle of the specimen
- A freeze-fracture replica is then made by vacuum deposition of platinum and carbon. The replica can then be viewed under an electron microscope.
Also, check out- Difference between Group I and Group II introns – My Biology Dictionary
3. FREEZE ETCHING TECHNIQUE
The freeze etching technique is parallel to the freeze-fracture technique, but it adds a further step to the freeze-fracture procedure. Freeze–etching is specifically useful because it avoids exposure to fixatives, embedding agents, and stains, all of which may deform cell ultrastructure.

Image source- Tsuji, T., & Fujimoto, T. (2017). Freeze-fracture-etching Electron Microscopy for Facile Analysis of Yeast Ultrastructure. Bio-protocol, 7(18), e2556-e2556.
Procedure
- After fracturing the specimen, broken tissue is briefly exposed to vacuum which results in the sublimation of water from the fractured surfaces.
- This removal of water produces an “etching” effect which makes the small areas of the true cell surface around the periphery of the fracture face stand out against the background.
- A replica of the freeze-etched specimen is made and can be viewed with the electron microscope.
4. SHADOW CASTING
Shadow casting is a technique in which the specimen is coated with a thin layer of metal at an angle. When observed under an electron microscope, the coated and uncoated parts of the specimen can be distinguished based on the shadow cast by these surface irregularities.

Image source- biologyease.com
Procedure
- There is an in-vacuum deposition of a metallic film on dried specimens.
- The metal is deposited from an oblique angle so that it coats some surfaces of the specimen more than others. This leaves the area to the “leeward” side of the specimen uncoated producing a “shadow” of the specimen.
- The areas not coated by the beam of atoms are more electron transparent and appear lighter than the surrounding areas under the microscope.
The electron microscope is one of the most powerful scientific instruments and a ground-breaking tool for biological research. The various set of procedures for specimen preparation, such as negative staining, shadow casting and freeze-fracture, have created enormous possibilities in the field of research.
Keep reading at MBD to know about more such indispensable tools and practices!
Team MBD
Watch SEM- The Scanning Electron Microscope – YouTube

